Did you have time to check out the cute chalkboard label mason jars? We cannot wait to use them on our upcoming beach trip! Here's another project we did using Expressions Vinyl. This time we used the Etched Glass Vinyl to personalize coffee mugs.
Showing posts with label Craft. Show all posts
Monday, April 28, 2014
Monday, April 14, 2014
Chalkboard Vinyl Mason Jars
If you've been following Southern Color then you know our favorite craft machine is our Silhouette! Honestly, it's one of the best purchases we have ever made. The Silhouette allows you to personalize ordinary items and make them into something special. Today we are sharing with you a tutorial to create chalkboard labels that can be added to almost anything, like these cute mason jar tumblers!
Monday, March 3, 2014
Office Makeover Reveal
Are you ready for the office reveal?!? Last week we shared with you our Office Inspiration Board and today we're going to give you a tour of the room! If you follow us on Instagram, then you've seen a few sneak peeks.
We've been working really hard on this project - many weekends dedicated to building the built-in shelves and painting the stenciled wall. The final product is exactly what we had imagined and we couldn't be happier! Plus Southern Color gained a new team member along the way...check Molly out below.
Monday, February 24, 2014
New Interior Design Project | Office Makeover
Good morning!
Julia and I have been hard at work making over a room in our parent's home. Now that us kids are grown, our childhood rooms are being used for other purposes. For this project we transformed our brother's childhood room into our parent's home office!
The inspiration for this room came from Royal Design Studio's Elsabet Stencil. A large graphic design like this can completely change the look and feel of a space on a small budget. Large stencils like these range in price from $30 - $60. We chose to stencil the wall you see when you walk into the office, directly across from the door, to create the largest impact.
Another show stopper piece in this room is the built in bookcases. Julia and I have really been wanting to DIY a project like this. We researched many plans from Ana White to Sawdust Girl, but in the end we developed our own plans inspired by the compilation of different pieces. We decided to have one large hanging book shelf suspended from the ceiling and above the desktop work surface by 2 ft.
We are planning to decorate and accessorize the room with items our parents already have but we'll still need to purchase a few things to tie everything together. Here are some of the products we used for the makeover.
Back of Bookcases: Behr Tasmanian Sea Turquoise
Stencil Highlight Color: Behr Ivory Mist
Accent Pillows: Ikat Print Pillow Covers from That Dutch Girl
Office Accessories: Red Baskets from the Dollar Store
Accent Chairs: Red Leather Chairs from Costco
Built-In Bookcase: Pure Bond Birch Plywood
Built-In Paint Color: Behr White Trim Paint
Stop by in a few weeks for all the project details and the reveal!
Monday, January 27, 2014
Valentine's Day Dishtowel | Pottery Barn Inspired
We "love" a good knock off project, so today we are sharing with you a Valentine's Day dishtowel. This project was inspired by Pottery Barn's "LOVE" dish towel. I tweaked the colors and did red wording instead of black to make it more specific to Valentine's Day.
Monday, January 20, 2014
Dollar Store Challenge | Glass Candlestick
Today we have an awesome project to share with you! We are joining Everyday Home in The Great Dollar Store Challenge. The 4th Thursday of each month we will share with you a different project using Dollar Store items. For this month's challenge we used glass candlesticks.


We created a Picture Frame and Message Board for The Dollar Store Challenge. This is one of our favorite crafts! It was so easy and super affordable...our kind of project.
Monday, December 30, 2013
Year in Review
Another awesome year has flown by!! Thank you to all of our readers who continue to support us and our blog! When we started Southern Color our goal was to inspire others and to give them the confidence to DIY. We hope you find our tutorials easy to follow and eventually try them out.
We were pretty busy in 2013 so we want to take some time to revisit all of the projects we completed.
Monday, December 23, 2013
Monogrammed Door Hanger {Last Minute Christmas Gift}
Monday, December 16, 2013
Holiday Painted Wood Signs & Gifts
A few weeks ago we posted this picture on Pinterest of our wood signs being sold at a local Christmas gift mart. We had no clue it would be pinned over 400 times ~ thanks for the love! So we figured it was finally time to share with y'all how we made all of these signs :)
Monday, December 2, 2013
Holiday Inspiration - Wood Signs & Burlap Pillows
The Christmas season has officially begun! We hope y'all had a terrific Thanksgiving with family and friends, but since it's already December we've got to start talking about Holiday projects...there are only 23 days until Christmas!
Some of our best holiday inspiration comes from catalogues. We love flipping through the pages of Pottery Barn for holiday décor ideas. Unfortunately, our budgets aren't limitless, so some of the more expensive items must be DIY'ed!
Monday, November 25, 2013
Joy to the World Serving Tray
Monday, November 18, 2013
Merry Christmas Banner
Thursday, November 7, 2013
Southern Holiday Life
Monday, October 28, 2013
How to Throw a Successful Pinterest Party
Sunday, October 6, 2013
Fall Roundup
It's Fall Y'all!
Today we are sharing with you a Fall Roundup of our fall crafts & recipes!
Atlanta
finally feels like fall. The mornings & nights are cool and the
leaves are starting to change. This time of year makes us think of
football games, apple picking, pumpkin carving, racking leaves, and
enjoying a cocktail by the fire.
Today we are sharing with you a Fall Roundup of our fall crafts & recipes!
Monday, September 30, 2013
Fall Centerpiece + Giveaway
Fall is almost here which means it is time to start decorating your home. One of the first places I like to decorate is my dining table. It's one of the first things people see when they come into my home so I always want it to look nice and festive!
We love the idea of layering fabrics on your table. Here we have a burlap table cloth with an orange print runner. The combination of rustic and graphic is perfect for this space.
Monday, September 16, 2013
Simple DIY Halloween Candy Jar
When I think of Halloween I think of zombies, monsters, witches and CANDY. It's the one time of year when it is acceptable to eat candy for breakfast, lunch, and dinner. So why not proudly display your vice in a cute candy jar...instead of stashing it away in a hidden cupboard in the kitchen. Oops, did I just tell you my hiding place - please don't repeat that. Personally, I'm a sucker for anything with chocolate, caramel, nuts and peanut butter so when I saw Snickers with Peanut Butter in the grocery store I had to get some. I really wanted to get 10 bags but I resisted the urge and only got one - y'all should be proud of me...it was really hard.
Monday, September 9, 2013
Halloween Craft: Trick or Treat Door Hanger
You know we love a good burlap craft! So today I'm going to share with you a Halloween Trick or Treat door hanger. I'm not exactly sure how our love for burlap started but it's one of those great materials that is inexpensive, easy to work with and always looks good. We hope you share our love ;)
Monday, August 26, 2013
Collegiate Burlap Football Door Hanger
Football season is almost here - woot woot!! That means it is time to decorate the front door and wave your alma mater in your neighbor's face...just kidding. I usually put a cute red and black deco mesh wreath on the front door but this year I'm switching it up. We're decorating our homes with burlap football door hangers!
Monday, February 25, 2013
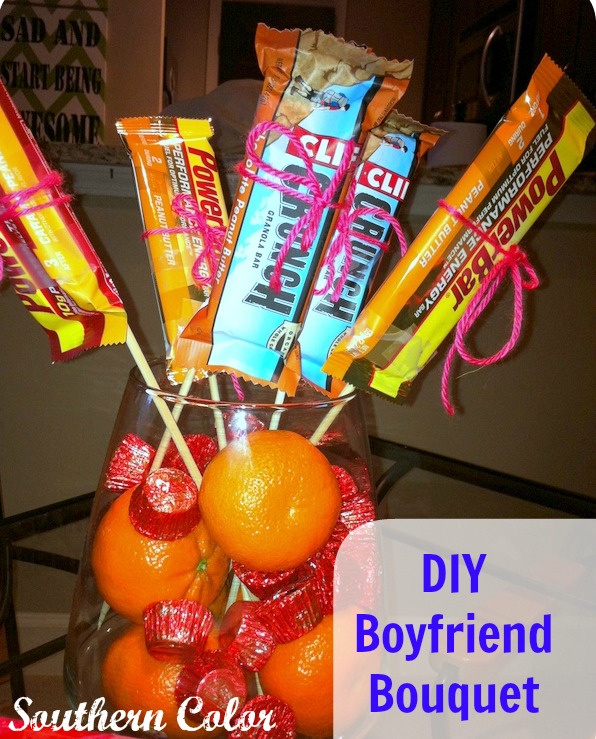
DIY Boyfriend Bouquet
Morning everyone! How was your weekend!
Julia and I attended a fun wine tasting event on Friday for an up & coming business, but you'll have to check back in a few weeks for an update. The company doesn't go "live" until mid March. We spent a decent amount of time working on the #GuestroomMakeoever creating cornice boards, touching up paint, installing some furniture - it finally is beginning to look like a a Guestroom!! I also found some time to meet up with friends on Saturday for dinner at TnT, the best mexican restaurant ever!
------------------------------ Time for a craft --------------------------------------
The other week was Valentine's, the most loving & romantic day on earth ;) The BF's work schedule has been pretty hectic lately so our plans were kind of altered last minute. Our night was spent watching our favorite shows and eating our favorite pizza, and I was glad to have my Valentine with me. He makes doing the most mundane things seem so fun!
I'm a lucky girl and the BF spoils me with pretty flowers. I wanted to give him something that would be just as pretty, a DIY Boyfriend Bouquet!
To make you will need:
wooden skewers
vase
tape
yarn/ribbon
candy
cuties
power bars
Fill your vase with cuties and reese's (the BF's favorite). Tape power bars on to the wooden skewers. Tie yarn around the power bar where the tape went. Arrange your bars in the vase.
I think he really enjoyed coming home on Valentine's Day to be surprised by his pretty arrangement :) I also had a puzzle made from a picture I took on our Chicago trip. Over Christmas we both really enjoyed putting together a puzzle, so I thought it would be the perfect gift for him. And it's personalized because it's from one of our trips :)

Subscribe to:
Posts (Atom)