Wednesday, August 31, 2011

What to do with a big empty wall?

Pin It
I absolutely love our house! Our bedroom is on it's own floor with a small landing outside of the bedroom.  It's perfect for when we have guests...they get the top floor all to themselves and we get our privacy on the middle floor.  And we figured it's a good floorplan for when we have kids (not any time soon though)  because we can see all of the bedrooms from the landing outside of our room. 

But we are left with this huge wall outside of our bedroom that is probably 20 feet tall and needs something massive to fill all of the bare space.  So we decided to cover the wall with our wedding pictures!  Instead of putting one or two wedding pics in each room in our house we've grouped them all together on this wall to make a huge statement.  Also, the landing is the perfect place to stop and look at all of the pictures. 

Frames purchased from Michaels


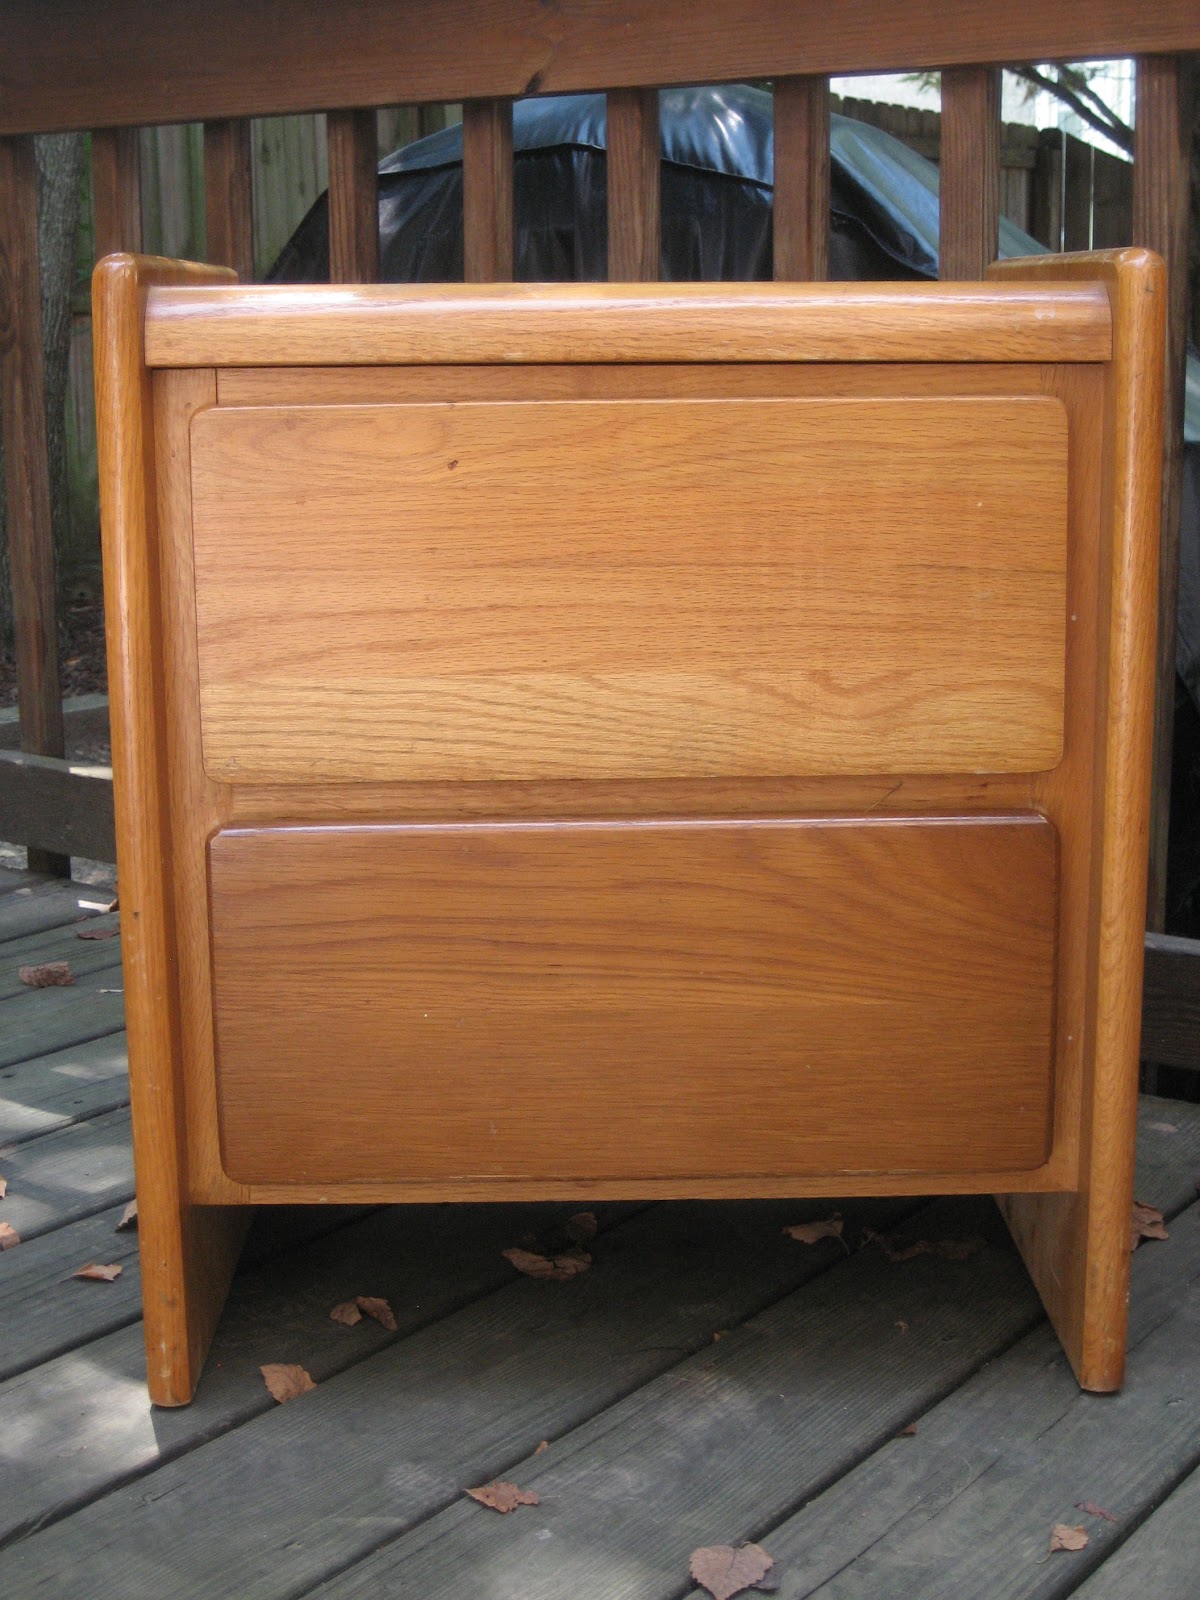
I'm thinking a dresser would fit perfectly under the pictures.  I want to get a long one that will fill up the space, needs to be refinished and has tons of storage - we don't have any linen closests so I'm thinking the dresser will make the perfect linen closet.  Now I just need to find a dresser and figure out what color to paint it....any suggestions?

Tuesday, August 23, 2011

Weekend Celebration

Pin It
I hope everyone had a great weekend...I did!  This weekend I got to hang out with three of my dearest friends.  Ever since I moved away from Altanta I don't get very many opportunities to see them all at once.  So when we realized that we were all free this weekend we jumped at the chance to hang out.  Although we planned this get together over a month ago we couldn't have picked a better weekend.  One of my friends just got engaged to the man of her dreams while another one's birthday was on Sunday.  I can't say we got crazy and went bar hopping (I guess this means were getting old) but we did have a great day at the pool catching up and drinking margaritas!

In order to celebrate my friend's birthday my amazing sister made Banana Pudding Cupcakes.  They were absolutely delicious and tasted just like Banana Pudding.  


Here's the Recipe:

1 Box French Vanilla Cake Mix
1 Box  Instant Banana Cream Pudding (3.4oz)
3 Eggs
1/2 Cup of Vegetable Oil
1/2 Cup of Water
8oz of Soure Cream
1 tsp. of Vanilla
1 Cup of Bananas, smashed
2 Cups of Nilla Wafer, crushed (plus more for garnishing if desired)
8oz of Cool Whip

Steps:

1. In a large bowl, add the first 6 ingredients
2. Mix until all of the ingredients are combined
3. Fold in the bananas and Nilla Wafers
4. Line cupcake pans with cupcake baking papers
5. Spoon the batter into the cupcake baking papers (about 3/4 full)
6. Place the cupcakes into a preheated 35o degree oven for 18-20 minutes
7. When cupcakes are done, remove them from the pan and place them on a baking sheet
8. Place them into the freezer to cool for 10 minutes
9. Garnish with Cool Whip and crushed Nilla Wafers 
10. Serve cold


Recipe adapted from Divas Can Cook:


Friday, August 19, 2011

Oreo Popsicles!

Pin It
Growing up in Atlanta, I can remember some very hot summers!  Typically, in the summers, we would live at the pool just trying to stay as cool as possible.  An all time favorite of mine is homemade popsicles!  Last time I stopped by my parents house I made sure to grab my mom’s Tupperware popsicle makers – they might be 20+ years old, but they still work great!


What your need:
Almond milk (either vanilla or original)
Pudding Mix
Popsicle holders


Step 1: make the pudding according to the recipe on the box


Step 2: pour pudding mixture into popsicle holders


Step 3: freeze for about 3 hrs.


Step 4:  Enjoy!


Today's Post brought to you by my fabulous sister, Elizabeth!


These look delicious....can't wait to make some!

Wednesday, August 17, 2011

Vintage Window Wall Art

Pin It
Choosing artwork for a room is probably one of the biggest challenges I face when it comes to decorating.  My husband has already told me that floral pictures are off limits which eliminates the majority of the framed pictures for sale at TJ Maxx and Kirkland's.  What's a girl to do - you can only hang so many mirrors. 

Well, I've found the perfect solution for my shabby chic guest room - Windows!  (Sorry the room is not quite finished so you can only see the windows I hung)  I found these awesome windows in my grandparent's barn in upstate New York.  They were the original windows on their house which was built in the late 1800s.  They even have the old glass in them - which I love.  They were pretty dirty when I got them but after a lot of 409 they look great! 


There are so many different things you can do with old windows.  You can paint images on the window panes, put pictures in the panes, use the window as a door to a cabinet, make a headboard - the possibilities are endless!  I wish I had brought more windows home with me - the barn was full of them.

Hmm....maybe a trip to New York is in order!


What do you think is the best way to repurpose old windows?


Monday, August 15, 2011

Fan Installation

Pin It
Although we bought our dream home there were several minor improvements we wanted to make.  One in paticular was updating the light fixtures in pretty much every room.  We had a mix match of white and gold fixtures from the 80s and very contemporary fixtures that looked like they belonged to the Jetson's.  So we've starting changing out the light fixtures one room at a time.  So far we have updated 6 fixtures in our house.  The first one took several hours to install but now we are able to install them pretty easily.

Last week we decided to put in a fan in one of our guest rooms. 
Living in the south this is definitely a necessity for every room! 

 Here are all of the pieces for the new fan!


Old Light Fixture in Guest Room


Unscrew wires to detach the old fixture from the electrical outlet box.

Here's what you're left with once the old fixture is removed.


Mount the support bracket of the new light fixture to the electical box.

Screw wires from electrical outlet box and new light fixture together.

Attach fan and enjoy!
Of course their are many more little steps such as screwing the fan blades to the motor but the hardest part is the electrical.  Once you master that you can install any light fixture!


Thursday, August 11, 2011

Sierra's Dog Bed

Pin It
My sister, Elizabeth, is an amazing sewer - definitely a lot better than me!  She recently made a dog bed for one of our good friend's dog, Sierra. The best part of all: the entire project was FREE!  All of the fabrics were hand-me-downs from our grandmother and from a friend’s grandmother.  
Check out her tutorial: 

Step 1: Select coordinating fabrics

Step 2: Iron fabric

Step 3: Cut fabric to the appropriate shape and size.  I did a rectangle for the bed and a dog bone for the accent.

Step 4: Pipe a contrasting color around the edges of the accent (dog bone). You will need to use a lot of pens to secure the piping.

Step 5: Sew on the piping and the dog bone to the main background.

Step 6:  Use the same fabric as the accent for the ruffles on the side.  Fold the into a long rectangle- about double the length.  Run a loose needle & thread through the top and pull the thread to create a ruffle.

Step 7: Pin the ruffle on the inside of the pillow (inside out).  Sew all the edges leaving a small opening for the batting.
Step 8: Turn the pillow right side out.  Fit the batting to the size of the pillow and then stuff inside.

Step 9: Sew the opening closed. 
Step 10: You have a cute dog bed!


Great job Elizabeth!  It looks like Sierra loves her dog bed!


Monday, August 8, 2011

Baby Blanket

Pin It
One of my favorite past times is sewing - I find it very relaxing.  My grandmother taught me how to sew at a young age.  I can remember working on a different sewing project with her every summer as a child. One project in particular that I have fond memories of is a pink pilllow I made that looks like a cat. As a child I can't say I really enjoyed sewing but now I am so grateful that she taught me because I get to make things for my friends and family.

Here's a baby blanket I made for my nephew a few months ago:

   I used 4 different cotton prints for the front of the blanket and a fleece for the backside. Then I used one of the prints for a border around the entire blanket.

Here's a baby wipe case and diaper holder I also created using the same fabric:

Hope this inspires you to create something amazing!

Friday, August 5, 2011

Happy Friday: Drink Recommendation

Pin It
Several weeks ago a friend (thanks Lauren!) introduced me to my new favorite drink - Pimm's Cup!

Here's the recipe:
2 oz Pimm's
1/4 oz fresh lemon juice
Ginger Ale
Muddled Cucumber
Ice
I highly recommend that you try it this weekend!  It's light and refreshing - the cucumbers make you feel like you're at the spa.

If you live in Nashville Patterson House makes a great Pimm's Cup.

Here are some of their other creations:


Check out the ball of ice that goes in your drink!


Wednesday, August 3, 2011

Tip of the Week

Pin It
Over the weekend I painted our guest bath (pics to follow as soon as it's complete) and of course it required two coats of paint.  So how do you avoid cleaning your paint brushes mutliple times?  Freeze them!

All you do is wrap your brushes individually in plastic wrap or aluminum foil.  Make sure you wrap them tightly so no air gets in. Then just stick them in the freezer.  When you're ready to use them again take them out of the freezer in advance so they have time to thaw.

So easy and it saves you tons of time!


Sorry for the blurry pic - definitely broke my camera this weekend so I had to use my camera phone :(

Tuesday, August 2, 2011

Dresser Redo

Pin It
My husband and I are very lucky to have been given several pieces of furniture for our new home.  Two in particular are his childhood nightstand and dresser.  They are in great shape but slightly dated.  So I decided to paint them to go with our shabby chic look in our guest room. 

All I did was sand them down then paint them with Behr paint.  After they dried I sanded the edges to give them that antique look and then I painted them again with a brown glaze.  I left the brown glaze on for several minutes then wiped it off with an old rag.  To change the look even more I added hardware to all of the drawers. 

I think they turned out great and I absolutely love them!   

Nightstand Before

Nightstand After


Nightstand next to Duvet
Dresser After - sorry I forgot to take a before

The guest room is definitely a work in progress but I promise to post pictures once it's complete!
Related Posts Plugin for WordPress, Blogger...