

Morning! It's Thursday, the weekend is near!
Last night I tested out my apartment's workout center for the first time. It's pretty nice with 3 treadmills, 3 elipticals, 4 bikes, a few weight machines and free weights. I ran on the treadmill for 3.1 miles - but boy was it HOT!! The treadmills face a wall of windows with no blinds or curtains, the sun was shining straight in. I was dripping in sweat after! After my workout, the BF and I joined friends for some mexican at Tacos & Tequila, yummy! It was great to catch up with friends during the work week and I'm always in the mood for tacos ;)
Lately I've been seeing Race Bib Display Racks on Pinterest and Etsy. I think they are so cute and a great way to display your hard earned medals and race bibs. Today I'm going to share with you the DIY version. My rack cost $0 since I had everything, but I bet you could easily make this for under $20.
And this is the perfect way to display my race bib & medal from the Mud Crusade race :)

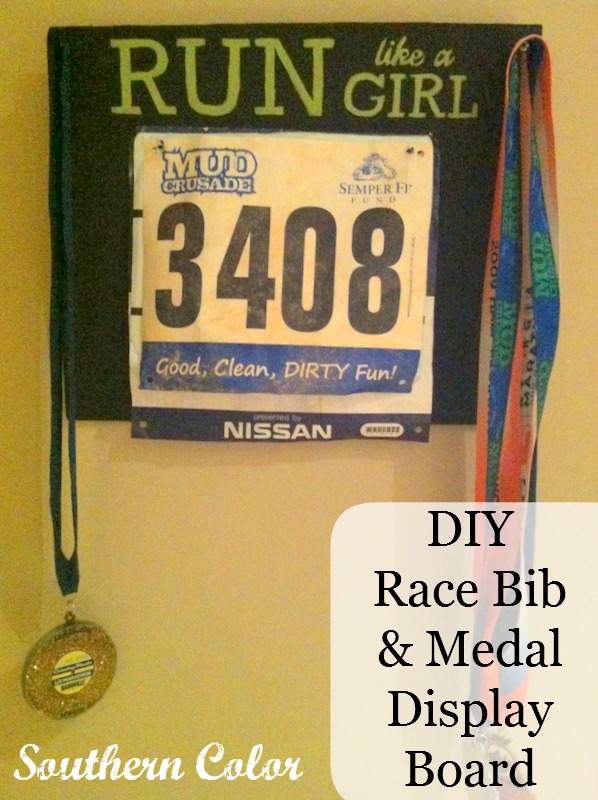

To start, you will need a thin piece of wood cut to size. You can find this at your local hardware store and ask them to cut it down for you. Or you can do what I did, go over to your parents house and search in your Dad's workshop for the perfect sized piece of wood :)

Create a stencil using our method or with your fancy Silhouette! I created my stencil in Word and turned the paper landscape. This is a good size.

Paint your board your desired color, I used black arcylic paint. And allow the board to dry before stenciling. Center the stencil on the board - you want to make sure there is enough space on either side to allow for your medals to hang without covering up the words.
I touched up my words after stenciling just to make the lines looked cleaner.

Now you need to add hooks to your board so that you can hang your race bibs & medals. I used nails and painted them black. I did one nail on either side of the wording and then 2 nails below the wording for the bibs to hang on. The distance of the 2 nails below will be determined from your race bibs. Lay your smallest bib in the center and mark where the holes are. Now you will need to go through your larger bibs and punch holes in them so that they can all hang.

Next step, how to hang it on the wall. I nailed in 2 nails to the back then stringed twine around them. If you have picture wire, use that. Be careful that your nails do NOT go through the front of the board.

Hang on the wall & enjoy!
One thing to note - the metals add a lot of weight to the display board. And if you have un-even weight of medals, it may cause the board to tilt in one direction.
If you have a suggestions on how to fix this, please let me know!

Have you re-created any Etsy or Pinterest crafts lately?
~Elizabeth


3 comments:
Very cool! I made my dad a simple quilt so he had a place to pin all of the pins he got from completing endurance cycling events. It's always fun to have it all displayed. :-) Thanks for sharing at The Fun In Functional!
What a great idea! Im really loving your blog and all the awesome projects you do, so I have nominated you for the Liester Blogger Award on my blog =) Hopefully it brings about some well deserved attention to your blog!
Here is the link: http://musthavewear.blogspot.com.au/2012/09/awards-night-hot-diggity-dog.html
The quilt idea is great! I think my next project will be making a quilt from all my race t-shirts.
Post a Comment